How does my Django site connect to the internet anyway?
I created a Django site to troll my cousin Barry who is a big San Diego Padres fan. Their Shortstop is a guy called Fernando Tatis Jr. and he’s really good. Like really good. He’s also young, and arrogant, and is everything an old dude like me doesn’t like about the ‘new generation’ of ball players that are changing the way the game is played.
In all honesty though, it’s fun to watch him play (anyone but the Dodgers).
The thing about him though, is that while he’s really good at the plate, he’s less good at playing defense. He currently leads the league in errors. Not just for all shortstops, but for ALL players!
Anyway, back to the point. I made this Django site call Does Tatis Jr Have an Error Today?It is a simple site that only does one thing ... tells you if Tatis Jr has made an error today. If he hasn’t, then it says No, and if he has, then it says Yes.
It’s a dumb site that doesn’t do anything else. At all.
But, what it did do was lead me down a path to answer the question, “How does my site connect to the internet anyway?”
Seems like a simple enough question to answer, and it is, but it wasn’t really what I thought when I started.
How it works
I use a MacBook Pro to work on the code. I then deploy it to a Digital Ocean server using GitHub Actions. But they say, a picture is worth a thousand words, so here's a chart of the workflow:

This shows the development cycle, but that doesn’t answer the question, how does the site connect to the internet!
How is it that when I go to the site, I see anything? I thought I understood it, and when I tried to actually draw it out, turns out I didn't!
After a bit of Googling, I found this and it helped me to create this:
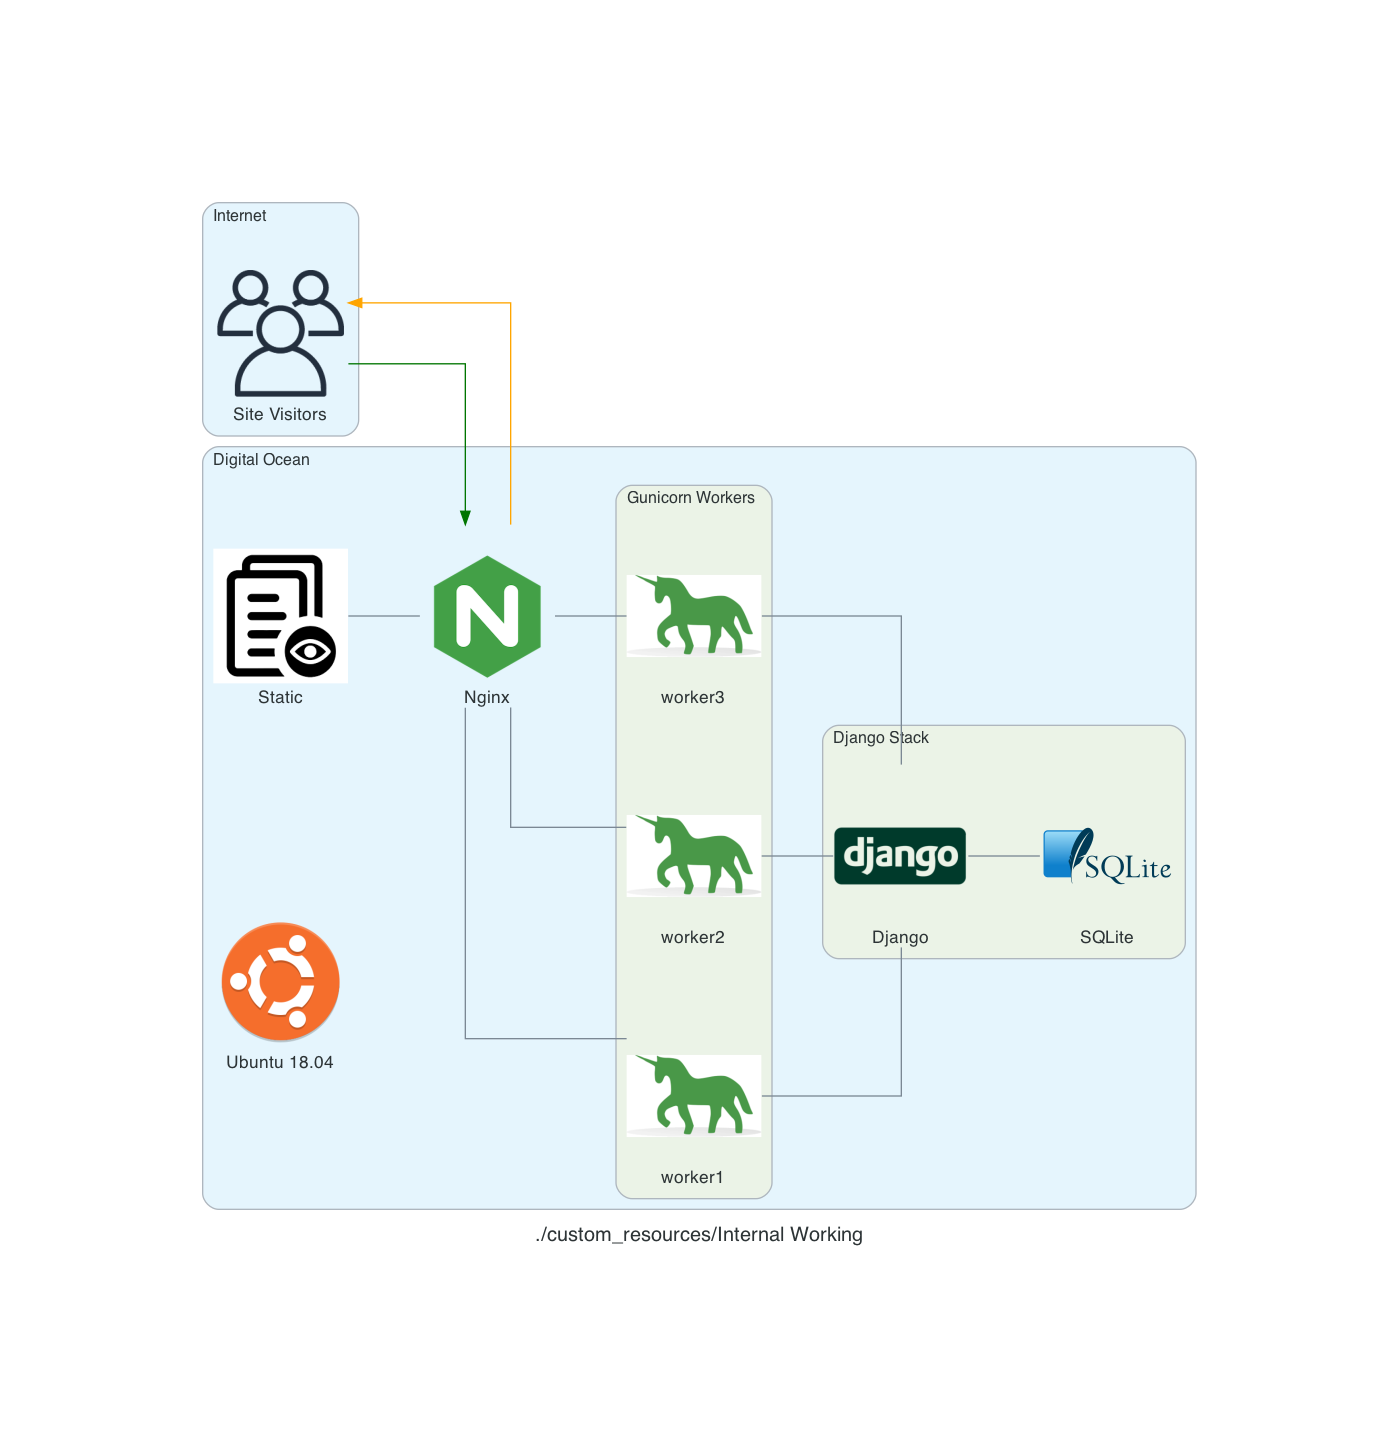
My site runs on an Ubuntu 18.04 server using Nginx as proxy server. Nginx determines if the request is for a static asset (a css file for example) or dynamic one (something served up by the Django App, like answering if Tatis Jr. has an error today).
If the request is static, then Nginx just gets the static data and server it. If it’s dynamic data it hands off the request to Gunicorn which then interacts with the Django App.
So, what actually handles the HTTP request? From the serverfault.com answer above:
[T]he simple answer is Gunicorn. The complete answer is both Nginx and Gunicorn handle the request. Basically, Nginx will receive the request and if it's a dynamic request (generally based on URL patterns) then it will give that request to Gunicorn, which will process it, and then return a response to Nginx which then forwards the response back to the original client.
In my head, I thought that Nginx was ONLY there to handle the static requests (and it is) but I wasn’t clean on how dynamic requests were handled ... but drawing this out really made me stop and ask, “Wait, how DOES that actually work?”
Now I know, and hopefully you do to!
Notes:
These diagrams are generated using the amazing library Diagrams. The code used to generate them is here.
Enhancements: Using GitHub Actions to Deploy
Integrating a version control system into your development cycle is just kind of one of those things that you do, right? I use GutHub for my version control, and it’s GitHub Actions to help with my deployment process.
There are 3 yaml files I have to get my local code deployed to my production server:
- django.yaml
- dev.yaml
- prod.yaml
Each one serving it’s own purpose
django.yaml
The django.yaml file is used to run my tests and other actions on a GitHub runner. It does this in 9 distinct steps and one Postgres service.
The steps are:
- Set up Python 3.8 - setting up Python 3.8 on the docker image provided by GitHub
- psycopg2 prerequisites - setting up
psycopg2to use the Postgres service created - graphviz prerequisites - setting up the requirements for graphviz which creates an image of the relationships between the various models
- Install dependencies - installs all of my Python package requirements via pip
- Run migrations - runs the migrations for the Django App
- Load Fixtures - loads data into the database
- Lint - runs
blackon my code - Flake8 - runs
flake8on my code - Run Tests - runs all of the tests to ensure they pass
name: Django CI

on:
  push:
    branches-ignore:
      - main
      - dev

jobs:

  build:
    runs-on: ubuntu-18.04
    services:
      postgres:
        image: postgres:12.2
        env:
          POSTGRES_USER: postgres
          POSTGRES_PASSWORD: postgres
          POSTGRES_DB: github_actions
        ports:
          - 5432:5432
        # needed because the postgres container does not provide a healthcheck
        options: --health-cmd pg_isready --health-interval 10s --health-timeout 5s --health-retries 5

    steps:
    - uses: actions/checkout@v1
    - name: Set up Python 3.8
      uses: actions/setup-python@v1
      with:
        python-version: 3.8
    - uses: actions/cache@v1
      with:
        path: ~/.cache/pip
        key: ${{ runner.os }}-pip-${{ hashFiles('**/requirements.txt') }}
        restore-keys: |
          ${{ runner.os }}-pip-
    - name: psycopg2 prerequisites
      run: sudo apt-get install python-dev libpq-dev
    - name: graphviz prerequisites
      run: sudo apt-get install graphviz libgraphviz-dev pkg-config
    - name: Install dependencies
      run: |
        python -m pip install --upgrade pip
        pip install psycopg2
        pip install -r requirements/local.txt
    - name: Run migrations
      run: python manage.py migrate
    - name: Load Fixtures
      run: |
        python manage.py loaddata fixtures/User.json
        python manage.py loaddata fixtures/Sport.json
        python manage.py loaddata fixtures/League.json
        python manage.py loaddata fixtures/Conference.json
        python manage.py loaddata fixtures/Division.json
        python manage.py loaddata fixtures/Venue.json
        python manage.py loaddata fixtures/Team.json
    - name: Lint
      run: black . --check
    - name: Flake8
      uses: cclauss/GitHub-Action-for-Flake8@v0.5.0
    - name: Run tests
      run: coverage run -m pytest
dev.yaml
The code here does essentially they same thing that is done in the deploy.sh in my earlier post Automating the Deployment except that it pulls code from my dev branch on GitHub onto the server. The other difference is that this is on my UAT server, not my production server, so if something goes off the rails, I don’t hose production.
name: Dev CI

on:
  pull_request:
    branches:
      - dev

jobs:
  deploy:
    runs-on: ubuntu-18.04
    steps:
      - name: deploy code
        uses: appleboy/ssh-action@v0.1.2
        with:
          host: ${{ secrets.SSH_HOST_TEST }}
          key: ${{ secrets.SSH_KEY_TEST }}
          username: ${{ secrets.SSH_USERNAME }}

          script: |
            rm -rf StadiaTracker
            git clone --branch dev git@github.com:ryancheley/StadiaTracker.git

            source /home/stadiatracker/venv/bin/activate

            cd /home/stadiatracker/

            rm -rf /home/stadiatracker/StadiaTracker

            cp -r /root/StadiaTracker/ /home/stadiatracker/StadiaTracker

            cp /home/stadiatracker/.env /home/stadiatracker/StadiaTracker/StadiaTracker/.env

            pip -q install -r /home/stadiatracker/StadiaTracker/requirements.txt

            python /home/stadiatracker/StadiaTracker/manage.py migrate

            mkdir /home/stadiatracker/StadiaTracker/static
            mkdir /home/stadiatracker/StadiaTracker/staticfiles

            python /home/stadiatracker/StadiaTracker/manage.py collectstatic --noinput -v0

            systemctl daemon-reload
            systemctl restart stadiatracker
prod.yaml
Again, the code here does essentially they same thing that is done in the deploy.sh in my earlier post Automating the Deployment except that it pulls code from my main branch on GitHub onto the server.
name: Prod CI

on:
  pull_request:
    branches:
      - main

jobs:
  deploy:
    runs-on: ubuntu-18.04
    steps:
      - name: deploy code
        uses: appleboy/ssh-action@v0.1.2
        with:
          host: ${{ secrets.SSH_HOST }}
          key: ${{ secrets.SSH_KEY }}
          username: ${{ secrets.SSH_USERNAME }}

          script: |
            rm -rf StadiaTracker
            git clone git@github.com:ryancheley/StadiaTracker.git

            source /home/stadiatracker/venv/bin/activate

            cd /home/stadiatracker/

            rm -rf /home/stadiatracker/StadiaTracker

            cp -r /root/StadiaTracker/ /home/stadiatracker/StadiaTracker

            cp /home/stadiatracker/.env /home/stadiatracker/StadiaTracker/StadiaTracker/.env

            pip -q install -r /home/stadiatracker/StadiaTracker/requirements.txt

            python /home/stadiatracker/StadiaTracker/manage.py migrate

            mkdir /home/stadiatracker/StadiaTracker/static
            mkdir /home/stadiatracker/StadiaTracker/staticfiles

            python /home/stadiatracker/StadiaTracker/manage.py collectstatic --noinput -v0

            systemctl daemon-reload
            systemctl restart stadiatracker
The general workflow is:
- Create a branch on my local computer with
git switch -c branch_name - Push the code changes to GitHub which kicks off the
django.yamlworkflow. - If everything passes then I do a pull request from
branch_nameintodev. - This kicks off the
dev.yamlworkflow which will update UAT - I check UAT to make sure that everything works like I expect it to (it almost always does … and when it doesn’t it’s because I’ve mucked around with a server configuration which is the problem, not my code)
- I do a pull request from
devtomainwhich updates my production server
My next enhancement is to kick off the dev.yaml process if the tests from django.yaml all pass, i.e. do an auto merge from branch_name to dev, but I haven’t done that yet.
Setting up multiple Django Sites on a Digital Ocean server
If you want to have more than 1 Django site on a single server, you can. It’s not too hard, and using the Digital Ocean tutorial as a starting point, you can get there.
Using this tutorial as a start, we set up so that there are multiple Django sites being served by gunicorn and nginx.
Creating systemd Socket and Service Files for Gunicorn
The first thing to do is to set up 2 Django sites on your server. You’ll want to follow the tutorial referenced above and just repeat for each.
Start by creating and opening two systemd socket file for Gunicorn with sudo privileges:
Site 1
sudo vim /etc/systemd/system/site1.socket
Site 2
sudo vim /etc/systemd/system/site2.socket
The contents of the files will look like this:
[Unit]
Description=siteX socket

[Socket]
ListenStream=/run/siteX.sock

[Install]
WantedBy=sockets.target
Where siteX is the site you want to server from that socket
Next, create and open a systemd service file for Gunicorn with sudo privileges in your text editor. The service filename should match the socket filename with the exception of the extension
sudo vim /etc/systemd/system/siteX.service
The contents of the file will look like this:
[Unit]
Description=gunicorn daemon
Requires=siteX.socket
After=network.target

[Service]
User=sammy
Group=www-data
WorkingDirectory=path/to/directory
ExecStart=path/to/gunicorn/directory
         --access-logfile -
         --workers 3
         --bind unix:/run/gunicorn.sock
         myproject.wsgi:application

[Install]
WantedBy=multi-user.target
Again siteX is the socket you want to serve
Follow tutorial for testing Gunicorn
Nginx
server {
    listen 80;
    server_name server_domain_or_IP;

    location = /favicon.ico { access_log off; log_not_found off; }
    location /static/ {
        root /path/to/project;
    }

    location / {
        include proxy_params;
        proxy_pass http://unix:/run/siteX.sock;
    }
}
Again siteX is the socket you want to serve
Next, link to enabled sites
Test Nginx
Open firewall
Should now be able to see sites at domain names
Using PostgreSQL
Once you’ve deployed your code to a web server, you’ll be pretty stoked. I know I was. One thing you’ll need to start thinking about though is converting your SQLite database to a ‘real’ database. I say ‘real’ because SQLite is a great engine to start off with, but once you have more than 1 user, you’ll really need to have a database that can support concurrency, and can scale when you need it to.
Enter PostgreSQL. Django offers built-in database support for several different databases, but Postgres is the preferred engine.
We’ll take care of this in stages:
- Create the database
- Prep project for use of Postgres
- Install needed package
- Update
settings.pyto change to Postgres - Run the migration locally
- Deploy updates to server
- Script it all out
Create the database
I’m going to assume that you already have Postgres installed locally. If you don’t, there are many good tutorials to walk you through it.
You’ll need three things to create a database in Postgres
- Database name
- Database user
- Database password for your user
For this example, I’ll be as generic as possible and choose the following:
- Database name will be
my_database - Database user will be
my_database_user - Database password will be
my_database_user_password
From our terminal we’ll run a couple of commands:
# This will open the Postgres Shell

psql

# From the psql shell

CREATE DATABASE my_database;
CREATE USER my_database_user WITH PASSWORD 'my_database_user_password';
ALTER ROLE my_database_user SET client_encoding TO 'utf8';
ALTER ROLE my_database_user SET default_transaction_isolation TO 'read committed';
ALTER ROLE my_database_user SET timezone TO 'UTC'
The last 3 ALTER commands are based on Django recommendations for Postgres user.
One thing to note, before you go creating databases and users, you should make sure that they don’t already exist. The \l will list the various databases present. If this is your first time in the psql shell you’ll see three databases list:
postgres
template0
template1
To see a list of the users \du will display that. If this is your first time in the psql shell you’ll see one user listed:
postgres
OK … the database has been created. Next, we start updating our project to use this new database engine
Prep project for use of Postgres
Install Needed Package
The only python package needed to use Postgres is psycopg2-binary so we’ll
pip install psycopg2-binary
Update settings.py
The DATABASES portion of the settings.py is set to use SQLite by default and will look (something) like this:
DATABASES = {
    'default': {
        'ENGINE': 'django.db.backends.sqlite3',
        'NAME': 'mydatabase',
    }
}
The Django documentation is really good on what changes need to be made. From the documentation we see that we need to update the DATABASES section to be something like this:
DATABASES = {
    'default': {
        'ENGINE': 'django.db.backends.postgresql',
        'NAME': 'mydatabase',
        'USER': 'mydatabaseuser',
        'PASSWORD': 'mypassword',
        'HOST': '127.0.0.1',
        'PORT': '5432',
    }
}
With our database from above, ours will look like this:
DATABASES = {
    'default': {
        'ENGINE': 'django.db.backends.postgresql',
        'NAME': 'my_database',
        'USER': 'my_database_user',
        'PASSWORD': 'my_database_user_password',
        'HOST': 'localhost',
        'PORT': '',
    }
}
The HOST is changed to localhost and we remove the value for PORT
Once we get ready to push this to our web server we’ll want to replace the NAME, USER, and PASSWORD with environment variables, but we’ll get to that later
Run migrations
OK, we’ve got our database set up, we’ve got our settings updated to use the new database, now we can run set that database up.
All that we need to do is to:
python manage.py migrate
This will run any migrations that we had created previously on our new Postgres database.
A few things to note:
- You will need to create a new
superuser - You will need to migrate over any data from the old SQLite database1
Congratulations! You’ve migrated from SQLite to Postgres!
- This can be done with the
datadumpanddataloadcommands available inmanage.py↩︎
Automating the deployment
We got everything set up, and now we want to automate the deployment.
Why would we want to do this you ask? Let’s say that you’ve decided that you need to set up a test version of your site (what some might call UAT) on a new server (at some point I’ll write something up about about multiple Django Sites on the same server and part of this will still apply then). How can you do it?
Well you’ll want to write yourself some scripts!
I have a mix of Python and Shell scripts set up to do this. They are a bit piece meal, but they also allow me to run specific parts of the process without having to try and execute a script with ‘commented’ out pieces.
Python Scripts
create_server.py
destroy_droplet.py
Shell Scripts
copy_for_deploy.sh
create_db.sh
create_server.sh
deploy.sh
deploy_env_variables.sh
install-code.sh
setup-server.sh
setup_nginx.sh
setup_ssl.sh
super.sh
upload-code.sh
The Python script create_server.py looks like this:
# create_server.py

import requests
import os
from collections import namedtuple
from operator import attrgetter
from time import sleep

Server = namedtuple('Server', 'created ip_address name')

doat = os.environ['DIGITAL_OCEAN_ACCESS_TOKEN']

# Create Droplet
headers = {
    'Content-Type': 'application/json',
    'Authorization': f'Bearer {doat}',
}

data = <data_keys>
print('>>> Creating Server')
requests.post('https://api.digitalocean.com/v2/droplets', headers=headers, data=data)
print('>>> Server Created')
print('>>> Waiting for Server Stand up')
sleep(90)


print('>>> Getting Droplet Data')
params = (
    ('page', '1'),
    ('per_page', '10'),
)

get_droplets = requests.get('https://api.digitalocean.com/v2/droplets', headers=headers, params=params)

server_list = []

for d in get_droplets.json()['droplets']:
    server_list.append(Server(d['created_at'], d['networks']['v4'][0]['ip_address'], d['name']))

server_list = sorted(server_list, key=attrgetter('created'), reverse=True)

server_ip_address = server_list[0].ip_address
db_name = os.environ['DJANGO_PG_DB_NAME']
db_username = os.environ['DJANGO_PG_USER_NAME']
if server_ip_address != <production_server_id>:
    print('>>> Run server setup')
    os.system(f'./setup-server.sh {server_ip_address} {db_name} {db_username}')
    print(f'>>> Server setup complete. You need to add {server_ip_address} to the ALLOWED_HOSTS section of your settings.py file ')
else:
    print('WARNING: Running Server set up will destroy your current production server. Aborting process')
Earlier I said that I liked Digital Ocean because of it’s nice API for interacting with it’s servers (i.e. Droplets). Here we start to see some.
The First part of the script uses my Digital Ocean Token and some input parameters to create a Droplet via the Command Line. The sleep(90) allows the process to complete before I try and get the IP address. Ninety seconds is a bit longer than is needed, but I figure, better safe than sorry … I’m sure that there’s a way to call to DO and ask if the just created droplet has an IP address, but I haven’t figured it out yet.
After we create the droplet AND is has an IP address, we get it to pass to the bash script server-setup.sh.
# server-setup.sh

#!/bin/bash

# Create the server on Digital Ocean
export SERVER=$1

# Take secret key as 2nd argument
if [[ -z "$1" ]]
then
    echo "ERROR: No value set for server ip address1"
    exit 1
fi

echo -e "\n>>> Setting up $SERVER"
ssh root@$SERVER /bin/bash << EOF
    set -e

    echo -e "\n>>> Updating apt sources"
    apt-get -qq update

    echo -e "\n>>> Upgrading apt packages"
    apt-get -qq upgrade

    echo -e "\n>>> Installing apt packages"
    apt-get -qq install python3 python3-pip python3-venv tree supervisor postgresql postgresql-contrib nginx

    echo -e "\n>>> Create User to Run Web App"
    if getent passwd burningfiddle
    then
      echo ">>> User already present"
    else
      adduser --disabled-password --gecos "" burningfiddle
      echo -e "\n>>> Add newly created user to www-data"
      adduser burningfiddle www-data
    fi

    echo -e "\n>>> Make directory for code to be deployed to"

    if [[ ! -d "/home/burningfiddle/BurningFiddle" ]]
    then
        mkdir /home/burningfiddle/BurningFiddle
    else
        echo ">>> Skipping Deploy Folder creation - already present"
    fi


    echo -e "\n>>> Create VirtualEnv in this directory"
    if [[ ! -d "/home/burningfiddle/venv" ]]
    then
      python3 -m venv /home/burningfiddle/venv
    else
        echo ">>> Skipping virtualenv creation - already present"
    fi

    # I don't think i need this anymore
    echo ">>> Start and Enable gunicorn"
    systemctl start gunicorn.socket
    systemctl enable gunicorn.socket


EOF

./setup_nginx.sh $SERVER
./deploy_env_variables.sh $SERVER
./deploy.sh $SERVER
All of that stuff we did before, logging into the server and running commands, we’re now doing via a script. What the above does is attempt to keep the server in an idempotent state (that is to say you can run it as many times as you want and you don’t get weird artifacts … if you’re a math nerd you may have heard idempotent in Linear Algebra to describe the multiplication of a matrix by itself and returning the original matrix … same idea here!)
The one thing that is new here is the part
ssh root@$SERVER /bin/bash << EOF
    ...
EOF
A block like that says, “take everything in between EOF and run it on the server I just ssh’d into using bash.
At the end we run 3 shell scripts:
setup_nginx.shdeploy_env_variables.shdeploy.sh
Let’s review these scripts
The script setup_nginx.sh copies several files needed for the nginx service:
gunicorn.servicegunicorn.socketsnginx.conf
It then sets up a link between the available-sites and enabled-sites for nginx and finally restarts nginx
# setup_nginx.sh

export SERVER=$1
export sitename=burningfiddle
scp -r ../config/gunicorn.service root@$SERVER:/etc/systemd/system/
scp -r ../config/gunicorn.socket root@$SERVER:/etc/systemd/system/
scp -r ../config/nginx.conf root@$SERVER:/etc/nginx/sites-available/$sitename

ssh root@$SERVER /bin/bash << EOF

  echo -e ">>> Set up site to be linked in Nginx"
  ln -s /etc/nginx/sites-available/$sitename /etc/nginx/sites-enabled
  echo -e ">>> Restart Nginx"
  systemctl restart nginx
  echo -e ">>> Allow Nginx Full access"
  ufw allow 'Nginx Full'

EOF
The script deploy_env_variables.sh copies environment variables. There are packages (and other methods) that help to manage environment variables better than this, and that is one of the enhancements I’ll be looking at.
This script captures the values of various environment variables (one at a time) and then passes them through to the server. It then checks to see if these environment variables exist on the server and will place them in the /etc/environment file
export SERVER=$1

DJANGO_SECRET_KEY=printenv | grep DJANGO_SECRET_KEY
DJANGO_PG_PASSWORD=printenv | grep DJANGO_PG_PASSWORD
DJANGO_PG_USER_NAME=printenv | grep DJANGO_PG_USER_NAME
DJANGO_PG_DB_NAME=printenv | grep DJANGO_PG_DB_NAME
DJANGO_SUPERUSER_PASSWORD=printenv | grep DJANGO_SUPERUSER_PASSWORD
DJANGO_DEBUG=False

ssh root@$SERVER /bin/bash << EOF
    if [[ "\$DJANGO_SECRET_KEY" != "$DJANGO_SECRET_KEY" ]]
    then
        echo "DJANGO_SECRET_KEY=$DJANGO_SECRET_KEY" >> /etc/environment
    else
        echo ">>> Skipping DJANGO_SECRET_KEY - already present"
    fi

    if [[ "\$DJANGO_PG_PASSWORD" != "$DJANGO_PG_PASSWORD" ]]
    then
        echo "DJANGO_PG_PASSWORD=$DJANGO_PG_PASSWORD" >> /etc/environment
    else
        echo ">>> Skipping DJANGO_PG_PASSWORD - already present"
    fi

    if [[ "\$DJANGO_PG_USER_NAME" != "$DJANGO_PG_USER_NAME" ]]
    then
        echo "DJANGO_PG_USER_NAME=$DJANGO_PG_USER_NAME" >> /etc/environment
    else
        echo ">>> Skipping DJANGO_PG_USER_NAME - already present"
    fi

    if [[ "\$DJANGO_PG_DB_NAME" != "$DJANGO_PG_DB_NAME" ]]
    then
        echo "DJANGO_PG_DB_NAME=$DJANGO_PG_DB_NAME" >> /etc/environment
    else
        echo ">>> Skipping DJANGO_PG_DB_NAME - already present"
    fi

    if [[ "\$DJANGO_DEBUG" != "$DJANGO_DEBUG" ]]
    then
        echo "DJANGO_DEBUG=$DJANGO_DEBUG" >> /etc/environment
    else
        echo ">>> Skipping DJANGO_DEBUG - already present"
    fi
EOF
The deploy.sh calls two scripts itself:
# deploy.sh

#!/bin/bash
set -e
# Deploy Django project.
export SERVER=$1
#./scripts/backup-database.sh
./upload-code.sh
./install-code.sh
The final two scripts!
The upload-code.sh script uploads the files to the deploy folder of the server while the install-code.sh script move all of the files to where then need to be on the server and restart any services.
# upload-code.sh

#!/bin/bash
set -e

echo -e "\n>>> Copying Django project files to server."
if [[ -z "$SERVER" ]]
then
    echo "ERROR: No value set for SERVER."
    exit 1
fi
echo -e "\n>>> Preparing scripts locally."
rm -rf ../../deploy/*
rsync -rv --exclude 'htmlcov' --exclude 'venv' --exclude '*__pycache__*' --exclude '*staticfiles*' --exclude '*.pyc'  ../../BurningFiddle/* ../../deploy

echo -e "\n>>> Copying files to the server."
ssh root@$SERVER "rm -rf /root/deploy/"
scp -r ../../deploy root@$SERVER:/root/

echo -e "\n>>> Finished copying Django project files to server."
And finally,
# install-code.sh

#!/bin/bash
# Install Django app on server.
set -e
echo -e "\n>>> Installing Django project on server."
if [[ -z "$SERVER" ]]
then
    echo "ERROR: No value set for SERVER."
    exit 1
fi
echo $SERVER
ssh root@$SERVER /bin/bash << EOF
  set -e

  echo -e "\n>>> Activate the Virtual Environment"
  source /home/burningfiddle/venv/bin/activate


  cd /home/burningfiddle/

  echo -e "\n>>> Deleting old files"
  rm -rf /home/burningfiddle/BurningFiddle

  echo -e "\n>>> Copying new files"
  cp -r /root/deploy/ /home/burningfiddle/BurningFiddle

  echo -e "\n>>> Installing Python packages"
  pip install -r /home/burningfiddle/BurningFiddle/requirements.txt

  echo -e "\n>>> Running Django migrations"
  python /home/burningfiddle/BurningFiddle/manage.py migrate

  echo -e "\n>>> Creating Superuser"
  python /home/burningfiddle/BurningFiddle/manage.py createsuperuser --noinput --username bfadmin --email rcheley@gmail.com || true

  echo -e "\n>>> Load Initial Data"
  python /home/burningfiddle/BurningFiddle/manage.py loaddata /home/burningfiddle/BurningFiddle/fixtures/pages.json

  echo -e "\n>>> Collecting static files"
  python /home/burningfiddle/BurningFiddle/manage.py collectstatic

  echo -e "\n>>> Reloading Gunicorn"
  systemctl daemon-reload
  systemctl restart gunicorn

EOF

echo -e "\n>>> Finished installing Django project on server."
Preparing the code for deployment to Digital Ocean
OK, we’ve got our server ready for our Django App. We set up Gunicorn and Nginx. We created the user which will run our app and set up all of the folders that will be needed.
Now, we work on deploying the code!
Deploying the Code
There are 3 parts for deploying our code:
- Collect Locally
- Copy to Server
- Place in correct directory
Why don’t we just copy to the spot on the server we want o finally be in? Because we’ll need to restart Nginx once we’re fully deployed and it’s easier to have that done in 2 steps than in 1.
Collect the Code Locally
My project is structured such that there is a deploy folder which is on the Same Level as my Django Project Folder. That is to say

We want to clear out any old code. To do this we run from the same level that the Django Project Folder is in
rm -rf deploy/*
This will remove ALL of the files and folders that were present. Next, we want to copy the data from the yoursite folder to the deploy folder:
rsync -rv --exclude 'htmlcov' --exclude 'venv' --exclude '*__pycache__*' --exclude '*staticfiles*' --exclude '*.pyc' yoursite/* deploy
Again, running this form the same folder. I’m using rsync here as it has a really good API for allowing me to exclude items (I’m sure the above could be done better with a mix of Regular Expressions, but this gets the jobs done)
Copy to the Server
We have the files collected, now we need to copy them to the server.
This is done in two steps. Again, we want to remove ALL of the files in the deploy folder on the server (see rationale from above)
ssh root@$SERVER "rm -rf /root/deploy/"
Next, we use scp to secure copy the files to the server
scp -r deploy root@$SERVER:/root/
Our files are now on the server!
Installing the Code
We have several steps to get through in order to install the code. They are:
- Activate the Virtual Environment
- Deleting old files
- Copying new files
- Installing Python packages
- Running Django migrations
- Collecting static files
- Reloading Gunicorn
Before we can do any of this we’ll need to ssh into our server. Once that’s done, we can proceed with the steps below.
Above we created our virtual environment in a folder called venv located in /home/yoursite/. We’ll want to activate it now (1)
source /home/yoursite/venv/bin/activate
Next, we change directory into the yoursite home directory
cd /home/yoursite/
Now, we delete the old files from the last install (2):
rm -rf /home/yoursite/yoursite
Copy our new files (3)
cp -r /root/deploy/ /home/yoursite/yoursite
Install our Python packages (4)
pip install -r /home/yoursite/yoursite/requirements.txt
Run any migrations (5)
python /home/yoursite/yoursite/manage.py migrate
Collect Static Files (6)
python /home/yoursite/yoursite/manage.py collectstatic
Finally, reload Gunicorn
systemctl daemon-reload
systemctl restart gunicorn
When we visit our domain we should see our Django Site fn
Getting your Domain to point to Digital Ocean Your Server
I use Hover for my domain purchases and management. Why? Because they have a clean, easy to use, not-slimy interface, and because I listed to enough Tech Podcasts that I’ve drank the Kool-Aid.
When I was trying to get my Hover Domain to point to my Digital Ocean server it seemed much harder to me than it needed to be. Specifically, I couldn’t find any guide on doing it! Many of the tutorials I did find were basically like, it’s all the same. We’ll show you with GoDaddy and then you can figure it out.
Yes, I can figure it out, but it wasn’t as easy as it could have been. That’s why I’m writing this up.
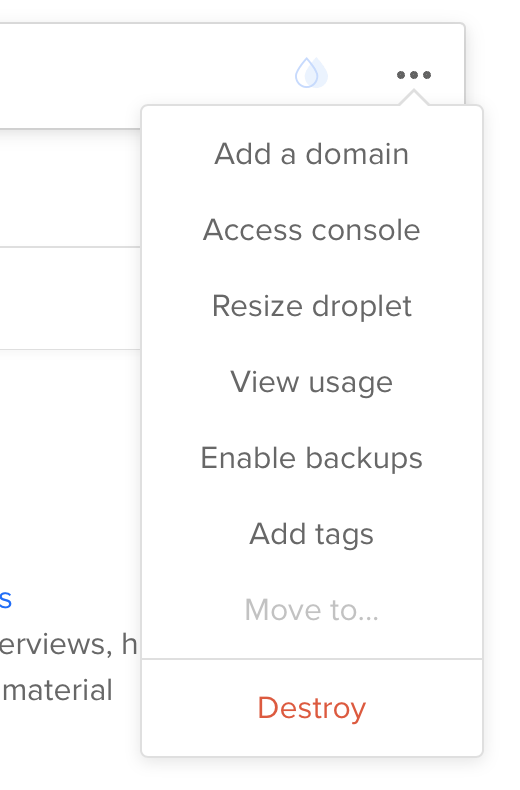
Digital Ocean
From Droplet screen click ‘Add a Domain’
<figure class="aligncenter">
</p>
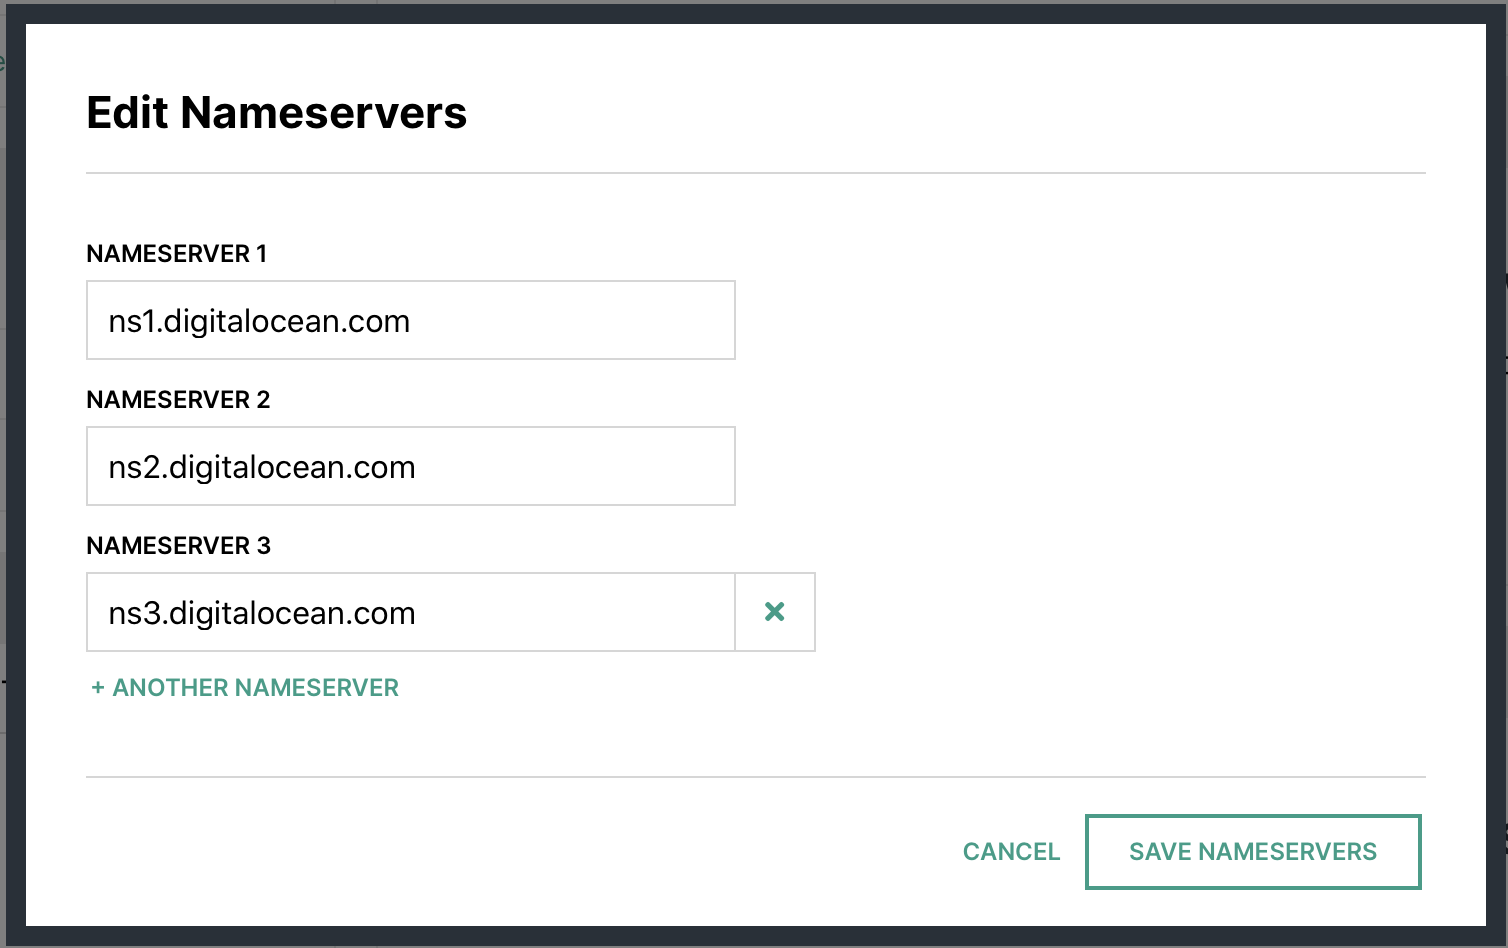
Add 2 ‘A’ records (one for www and one without the www)

Make note of the name servers

Hover
In your account at Hover.com change your Name Servers to Point to Digital Ocean ones from above.
Wait
DNS … does anyone really know how it works?1 I just know that sometimes when I make a change it’s out there almost immediately for me, and sometimes it takes hours or days.
At this point, you’re just going to potentially need to wait. Why? Because DNS that’s why. Ugh!
Setting up directory structure
While we’re waiting for the DNS to propagate, now would be a good time to set up some file structures for when we push our code to the server.
For my code deploy I’ll be using a user called burningfiddle. We have to do two things here, create the user, and add them to the www-data user group on our Linux server.
We can run these commands to take care of that:
adduser --disabled-password --gecos "" yoursite
The first line will add the user with no password and disable them to be able to log in until a password has been set. Since this user will NEVER log into the server, we’re done with the user creation piece!
Next, add the user to the proper group
adduser yoursite www-data
Now we have a user and they’ve been added to the group we need them to be added. In creating the user, we also created a directory for them in the home directory called yoursite. You should now be able to run this command without error
ls /home/yoursite/
If that returns an error indicating no such directory, then you may not have created the user properly.
Now we’re going to make a directory for our code to be run from.
mkdir /home/yoursite/yoursite
To run our Django app we’ll be using virtualenv. We can create our virtualenv directory by running this command
python3 -m venv /home/yoursite/venv
Configuring Gunicorn
There are two files needed for Gunicorn to run:
- gunicorn.socket
- gunicorn.service
For our setup, this is what they look like:
# gunicorn.socket

[Unit]
Description=gunicorn socket

[Socket]
ListenStream=/run/gunicorn.sock

[Install]
WantedBy=sockets.target
# gunicorn.service

[Unit]
Description=gunicorn daemon
Requires=gunicorn.socket
After=network.target

[Service]
User=yoursite
EnvironmentFile=/etc/environment
Group=www-data
WorkingDirectory=/home/yoursite/yoursite
ExecStart=/home/yoursite/venv/bin/gunicorn
         --access-logfile -
         --workers 3
         --bind unix:/run/gunicorn.sock
         yoursite.wsgi:application


[Install]
WantedBy=multi-user.target
For more on the details of the sections in both gunicorn.service and gunicorn.socket see this article.
Environment Variables
The only environment variables we have to worry about here (since we’re using SQLite) are the DJANGO_SECRET_KEY and DJANGO_DEBUG
We’ll want to edit /etc/environment with our favorite editor (I’m partial to vim but use whatever you like
vim /etc/environment
In this file you’ll add your DJANGO_SECRET_KEY and DJANGO_DEBUG. The file will look something like this once you’re done:
PATH="/usr/local/sbin:/usr/local/bin:/usr/sbin:/usr/bin:/sbin:/bin:/usr/games:/usr/local/games"
DJANGO_SECRET_KEY=my_super_secret_key_goes_here
DJANGO_DEBUG=False
Setting up Nginx
Now we need to create our .conf file for Nginx. The file needs to be placed in /etc/nginx/sites-available/$sitename where $sitename is the name of your site. fn
The final file will look (something) like this fn
server {
    listen 80;
    server_name www.yoursite.com yoursite.com;

    location = /favicon.ico { access_log off; log_not_found off; }
    location /static/ {
        root /home/yoursite/yoursite/;
    }

    location / {
        include proxy_params;
        proxy_pass http://unix:/run/gunicorn.sock;
    }
}
The .conf file above tells Nginx to listen for requests to either www.buringfiddle.com or buringfiddle.com and then route them to the location /home/yoursite/yoursite/ which is where our files are located for our Django project.
With that in place all that’s left to do is to make it enabled by running replacing $sitename with your file
ln -s /etc/nginx/sites-available/$sitename /etc/nginx/sites-enabled
You’ll want to run
nginx -t
to make sure there aren’t any errors. If no errors occur you’ll need to restart Nginx
systemctl restart nginx
The last thing to do is to allow full access to Nginx. You do this by running
ufw allow 'Nginx Full'
- Probably just [Julia Evans](https://jvns.ca/blog/how-updating-dns-works/ ↩︎
Setting up the Server (on Digital Ocean)
The initial setup
Digital Ocean has a pretty nice API which makes it easy to automate the creation of their servers (which they call Droplets. This is nice when you’re trying to work towards automation of the entire process (like I was).
I won’t jump into the automation piece just yet, but once you have your DO account setup (sign up here if you don’t have one), it’s a simple interface to Setup Your Droplet.
I chose the Ubuntu 18.04 LTS image with a \$5 server (1GB Ram, 1CPU, 25GB SSD Space, 1000GB Transfer) hosted in their San Francisco data center (SFO21).
We’ve got a server … now what?
We’re going to want to update, upgrade, and install all of the (non-Python) packages for the server. For my case, that meant running the following:
apt-get update
apt-get upgrade
apt-get install python3 python3-pip python3-venv tree postgresql postgresql-contrib nginx
That’s it! We’ve now got a server that is ready to be setup for our Django Project.
In the next post, I’ll walk through how to get your Domain Name to point to the Digital Ocean Server.
- SFO2 is disabled for new customers and you will now need to use SFO3 unless you already have resources on SFO2, but if you’re following along you probably don’t. What’s the difference between the two? Nothing 😁 ↩︎
Writing tests for Django Admin Custom Functionality
I’ve been working on a Django app side project for a while and came across the need to write a custom filter for the Django Admin section.
This was a first for me, and it was pretty straight forward to accomplish the task. I wanted to add a filter on the drop down list so that only certain records would appear.
To do this, I sub-classed the Django Admin SimpleListFilter with the following code:
class EmployeeListFilter(admin.SimpleListFilter):
    title = "Employee"
    parameter_name = "employee"

    def lookups(self, request, model_admin):
        employees = []
        qs = Employee.objects.filter(status__status="Active").order_by("first_name", "last_name")
        for employee in qs:
            employees.append((employee.pk, f"{employee.first_name} {employee.last_name}"))
        return employees

    def queryset(self, request, queryset):
        if self.value():
            qs = queryset.filter(employee__id=self.value())
        else:
            qs = queryset
        return qs
And implemented it like this:
@admin.register(EmployeeO3Note)
class EmployeeO3NoteAdmin(admin.ModelAdmin):
    list_filter = (EmployeeListFilter, "o3_date")
This was, as I said, relatively straight forward to do, but what was less clear to me was how to write tests for this functionality. My project has 100% test coverage, and therefore testing isn’t something I’m unfamiliar with, but in this context, I wasn’t sure where to start.
There are two parts that need to be tested:
lookupsqueryset
Additionally, the querysethas two states that need to be tested
- With
self.value() - Without
self.value()
This gives a total of 3 tests to write
The thing that helps me out the most when trying to determine how to write tests is to use the Django Shell in PyCharm. To do this I:
- Import necessary parts of Django App
- Instantiate the
EmployeeListFilter - See what errors I get
- Google how to fix the errors
- Repeat
This is what the test ended up looking like:
import pytest

from employees.models import EmployeeO3Note
from employees.tests.factories import EmployeeFactory, EmployeeO3NoteFactory, EmployeeStatusFactory
from employees.admin import EmployeeListFilter


ACTIVE_EMPLOYEES = 3
TERMED_EMPLOYEES = 1


@pytest.fixture
def active_employees():
    return EmployeeFactory.create_batch(ACTIVE_EMPLOYEES)


@pytest.fixture
def termed_employees():
    termed_employees = TERMED_EMPLOYEES
    termed = EmployeeStatusFactory(status="Termed")
    return EmployeeFactory.create_batch(termed_employees, status=termed)


@pytest.fixture
def o3_notes_for_all_employees(active_employees, termed_employees):
    all_employees = active_employees + termed_employees
    o3_notes = []
    for i in range(len(all_employees)):
        o3_notes.append(EmployeeO3NoteFactory.create_batch(1, employee=all_employees[i]))
    return o3_notes


@pytest.mark.django_db
def test_admin_filter_active_employee_o3_notes(active_employees):
    employee_list_filter = EmployeeListFilter(request=None, params={}, model=None, model_admin=None)
    assert len(employee_list_filter.lookup_choices) == ACTIVE_EMPLOYEES


@pytest.mark.django_db
def test_admin_query_set_unfiltered_results_o3_notes(o3_notes_for_all_employees):
    total_employees = ACTIVE_EMPLOYEES + TERMED_EMPLOYEES
    employee_list_filter = EmployeeListFilter(request=None, params={}, model=None, model_admin=None)
    assert len(employee_list_filter.queryset(request=None, queryset=EmployeeO3Note.objects.all())) == total_employees


@pytest.mark.django_db
def test_admin_query_set_filtered_results_o3_notes(active_employees, o3_notes_for_all_employees):
    employee_to_test = active_employees[0]
    employee_list_filter = EmployeeListFilter(
        request=None, params={"employee": employee_to_test.pk}, model=None, model_admin=None
    )
    queryset_to_test = employee_list_filter.queryset(request=None, queryset=EmployeeO3Note.objects.all())
    assert len(queryset_to_test.filter(employee__id=employee_to_test.pk)) == 1
Deploying a Django Site to Digital Ocean - A Series
Previous Efforts
When I first heard of Django I thought it looks like a really interesting, and Pythonic way, to get a website up and running. I spent a whole weekend putting together a site locally and then, using Digital Ocean, decided to push my idea up onto a live site.
One problem that I ran into, which EVERY new Django Developer will run into was static files. I couldn’t get static files to work. No matter what I did, they were just … missing. I proceeded to spend the next few weekends trying to figure out why, but alas, I was not very good (or patient) with reading documentation and gave up.
Fast forward a few years, and while taking the 100 Days of Code on the Web Python course from Talk Python to Me I was able to follow along on a part of the course that pushed up a Django App to Heroku.
I wrote about that effort here. Needless to say, I was pretty pumped. But, I was wondering, is there a way I can actually get a Django site to work on a non-Heroku (PaaS) type infrastructure.
Inspiration
While going through my Twitter timeline I cam across a retweet from TestDrive.io of Matt Segal. He has an amazing walk through of deploying a Django site on the hard level (i.e. using Windows). It’s a mix of Blog posts and YouTube Videos and I highly recommend it. There is some NSFW language, BUT if you can get past that (and I can) it’s a great resource.
This series is meant to be a written record of what I did to implement these recommendations and suggestions, and then to push myself a bit further to expand the complexity of the app.
Articles
A list of the Articles will go here. For now, here’s a rough outline of the planned posts:
- Setting up the Server (on Digital Ocean)
- Getting your Domain to point to Digital Ocean Your Server
- Preparing the code for deployment to Digital Ocean
- Automating the deployment
- Enhancements
The ‘Enhancements’ will be multiple follow up posts (hopefully) as I catalog improvements make to the site. My currently planned enhancements are:
- Creating the App
- Migrating from SQLite to Postgres
- Integrating Git
- Having Multiple Sites on a single Server
- Adding Caching
- Integrating S3 on AWS to store Static Files and Media Files
- Migrate to Docker / Kubernetes
Page 11 / 24